Dutch Oven Cooking
|
|
|


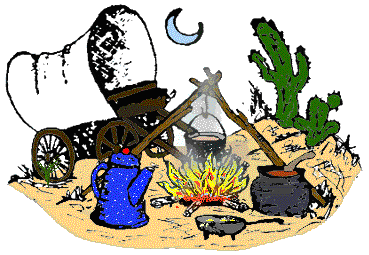
Introduction
What is it, and why bother?
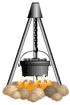
 A Dutch Oven is simply a metal cooking pot, of cast iron or cast aluminum, which in scouting finds its greatest utility on campouts. Obviously, Dutch Ovens, particularly cast iron ones, tend to be a bit heavy for backpacking, so Dutch Oven dinners, at least for most scouts, are best suited for car camping trips. Cast iron ovens are the most popular, but cast aluminum ovens have their advantages. Several brands are available, which are discussed elsewhere.
The reason for bothering with a Dutch Oven in the first place is that they are fairly easy to clean, can often be left unattended while dinner is cooking, and once you acquire a little expertise, allow you to prepare fancier meals than with most other types of camp cookware.
What brand should I buy?
There is quite a controversy over which type of Dutch Oven is better, cast iron or aluminum. Iron is more durable, distributes heat better, and holds heat longer. One disadvantage is weight.... a 12" diameter, cast iron Dutch Oven weighs 18 lbs. Another disadvantage is that cast iron ovens need to be seasoned.
By comparison, aluminum ovens cook slightly faster, are much lighter weight, and do not rust. If you are going backpacking, and you are careful to keep the cooking fire from getting too hot (remember aluminum melts much easier than iron), then aluminum is the way to go. However, despite the weight disadvantage and rust problem, cast iron ovens are preferred by most.Dutch Ovens are made by several companies, but when it comes to the cast iron ovens, Lodge is the best known brand and is considered by some to be the best overall. Lodge is also the official supplier for the Boy Scouts of America. However, other manufacturers offer features that Lodge dosen't. Links to several brands and suppliers of Dutch Ovens are given below. Check them out, and decide for yourself what's best.
- Kampers Kettle - Dutch Ovens and supplies
- Lodge Manufacturing - Cast Iron Dutch Ovens
- MACA Dutch Ovens - Deep-dish Cast Iron Dutch Ovens
- Scott Manufacturing - Cast Aluminum Dutch Ovens
- Ultimate Dutch Oven Co. - Cast Iron Dutch Ovens
- Lodge Manufacturing - Cast Iron Dutch Ovens
How many briquettes should I use?
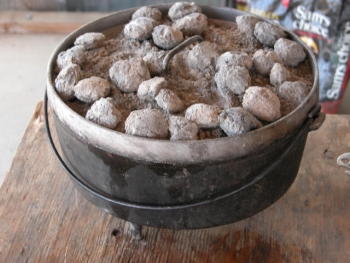 Although charcoal briquettes, wood coals straight from a campfire, and the campfire itself can all be used to cook with, high-quality charcoal briquettes, placed underneath and on top of the oven give more consistent heat. When it comes to briquettes, most campers consider Kingsford to be the best.
A good rule of thumb for cooking at a temperature of 300 to 325 degrees is to take the size of the Dutch Oven in inches and subtract three briquettes from that number to be placed beneath the oven, and add three to that number to be placed on top (on the oven lid). For example, a 12-inch Dutch Oven, requires 9 glowing briquettes beneath it, and 15 on the lid. For a 14-inch oven, place 11 briquettes beneath it, and 17 on top. Each additional briquette adds 15 to 20 degrees of heat. This rule varies with the type of food, altitude, wind conditions, and the outside air temperature, but it is a good place to start.
Remember that high altitude, cold weather, wind, and humidity all lower the cooking temperature. Thus, any of these conditions require longer cooking times or more briquettes. A wind also heats the upwind side of the Dutch Oven, requiring you to rotate the oven occasionally, or protect it with a windbreak of bricks or stones. Use fewer briquettes when cooking in the mid-day sun.
The distribution of briquettes is important too. Some recipes call for more, some for less, hot briquettes placed above and below the cooking pot, depending on how the heat needs to be distributed. Some hints follow.
- Soups, stews, or liquid dishes, require more heat (briquettes) beneath the oven than on top.
- Meat, poultry, potatoes, vegetables, and cobblers require an equal distribution of heat (briquettes) on top and bottom.
- Cakes, breads, biscuits, and cookies require more heat (briquettes) on top than beneath.
Because cast iron holds heat for a long time, food cooked in a Dutch Oven, and left in it with the lid on, will stay hot for over an hour. Simply remove all but 2 or 3 of the coals, keep the lid on, and wait until the rest of the meal is ready.
What type of charcoal should I use?
Wood coals from the campfire will work if need be, but good-quality charcoal briquettes are the most convenient heat source for Dutch Ovens. As with most things in life, you get what you pay for. There are lots of brands of briquettes, but most people swear by the Kingsford brand. You can get the "match-lite" variety for ultimate convenience, or invest in a chimney to get those briquettes lit and glowing in time for dinner.
What is the best way to clean a Dutch Oven?
NEVER USE A WIRE BRUSH OR SOAP to clean out a Dutch Oven. Both will remove the baked on finish and cause the pot to rust in just a few days. If you damage the finish, another seasoning is required before the rust gets too bad!
- Using plastic utensils or scrubbers, scrape out as much leftover food as possible, assuming any remains! Lining the pot with foil before cooking, speeds up this step.
- Food stuck on the sides of the pot can be burnt off by leaving some hot coals under the pot after the initial scraping. A better method is to heat some clean water in the pot until the water is almost boiling. Be sure to add hot water, not cold, as cold water will crack a hot oven. After the water is hot, use a plastic scrubber or sponge to scrape off stubborn pieces of food. Remember NO SOAP!
- After all traces of food have been removed, rinse with clean warm water (not cold, it will crack your oven) to wash off soot and whatever else remains.
- Allow the oven to air dry! This step can be sped up by heating the oven over the fire until it is just hot to the touch. Be careful lest you burn yourself!
- Wipe down both the inside and outside, then smear a thin coat of vetgetable oil or Crisco to the inside of the pot and underside of the lid. This step is not really necessary for aluminum ovens.
What about cooking areas?
Dutch Oven cooking is generally done on car camping trips, or at scouting demonstrations, but it can also be done in the backyard, on the stove top at home, or in the oven. On camping trips, the fire ring is the usual place. However, when the fire gets crowded with people or pots and you need some elbow room, laying a piece of foil on the ground and placing the requisite number of briquettes on the foil works great. Stacking pots one on top of the other is a another good trick if you need to save space.
What is the history of Dutch Oven cooking?
Dutch Ovens have been around for centuries. Our forefathers used them to to cook their dinners in the fireplace back in the early days of our country, and it is the same way their ancestors cooked back in the "Old Country". The famous "New England Boiled Dinner" dates back to when practically everyone in the Colonies cooked their dinner in a Dutch Oven in the fireplace.
Dutch and English settlers came to Africa during the Middle Ages and brought their cast iron cookware with them. These pots became known in South Africa as "potjie", pronounced "poi-kei", and Lord Baden-Powell was well versed in their use when he began formulating the basics of the Scouting movement just after the turn of the century. Dutch Oven cooking carries on the Baden-Powell tradition of Scouting.
Can I use my Dutch Oven on my home stove?
Sure, when cooking on gas or electric stoves, setting the burner on medium to medium-high works well for most recipes. Gas stoves will cook faster than electric stoves, so watch the Dutch Oven carefully when using the latter lest you burn the dinner. Most recipes call for temperatures of 300 to 325 degrees, so figure accordingly. You can also put the Dutch Oven in the stove oven. Try to match the oven temperature to the number of briquettes called for in the recipe.
Where can I find more information?
Some Dutch Oven links with additional information are given below:
- Dutch Oven Cooking - from MacScouter Online Magazine
- Dutch Oven Cook'n - from Chuck Wood
- International Dutch Oven Society (IDOS)
- IDOS Dutch Oven Links
- Kampers Kettle - Dutch Oven Supplies
- Lodge Manufacturing - Makers of Cast-iron Dutch Ovens
- Dutch Oven Cook'n - from Chuck Wood
How about some simple recipes?
We got 'em here. The links below provide some scout-tested recipes, simple and tasty enough to please the boys. If you are looking for more recipes, check out the links we've listed elsewhere. We've tried to rewrite the ones below simple enough for a scout to follow with minimal mistakes. (They still need to read the instructions though!)
More recipes from the Just Dutch Oven Recipes
Main Dishes |
 |
Desserts |
|
Breakfasts |
What do I do when the thing rusts?
Use a wire brush or steel wool to remove the rust, then season both pot and lid before they rust again. The trick is to clean it properly and store it properly the next time you use it. Then you won't have to keep re-seasoning the thing.
How do I season a Dutch Oven?
Before you cook in a cast iron Dutch Oven, it needs to be properly seasoned to seal the pores in the metal. Otherwise it rusts almost overnight. You will need to re-season the oven if it rusts, gets washed with soap, or someone else "cleans" it with a wire brush. Aluminum ovens do not need to be seasoned. Follow the steps below to do a good job of seasoning.
- New Dutch Ovens are often coated with waxy material to protect them. Peel any labels off, wash the pot with soapy water, or have at it with a steel wool or an S.O.S. pad to remove the coating; then rinse the pot thoroughly, and dry it quickly. You will be surprised how quickly a Dutch Oven rusts if you don't dry it immediately.
- Grease the Dutch Oven well with a thin coat of vegetable oil (Crisco shortning seems to work best) using a cotton cloth. All surfaces of both pot and lid, inside and out, need to be covered. DO NOT USE BUTTER, MARGARINE or SALAD OIL.
- Bake the Dutch Oven in the oven of the kitchen stove, or in an outdoor barbecue at 350 degrees for about one hour. Be prepared for lots of smoke if you do this indoors! A newly seasoned oven is golden brown in color, and develops a shiny black surface (patina) with use. The blacker the pot and the more it shines, the better.
If a Dutch Oven has not been used for a long time, smells rancid, rusts or discolors, or makes the food taste metallic, then it needs another seasoning and the steps above need to be repeated. Once again, aluminum ovens do not need to be seasoned.
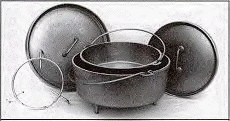
What size should I buy?
Dutch Ovens come in all sizes, but 8", 12" and 14" diameter ovens are the most common. A 12" oven is pretty standard and works well for a patrol of 8 scouts. Move up to a 14" diameter oven if you are feeding an army, or drop down to an 8" if it's just you and a friend.
What do you mean by stacking?
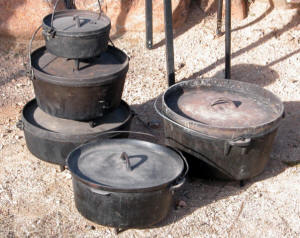 Stacking is a time-honored method of conserving space and briquettes when cooking with more than one Dutch Oven. Simply set up the first oven with coals beneath it and on the lid. Put the second oven right on top of the first, with coals on top of the second as well, and continue with as many ovens as the tower will support. Be aware that stacking changes your heat distribution, so you may need to vary the number of briquettes, or cooking times called for in the recipes.
How do I store a Dutch Oven?
It is best to store Dutch Ovens in a warm dry place with the lid slightly ajar. A paper towel or newspaper inside the pot helps to absorb any moisture that may build up, thereby helping to prevent rust. It is also a good idea to wipe down the inside of both the pot and lid with some vegetable oil or Crisco shortning.
What are some handy Dutch Oven tools?
There are lots of tools and gadgets to make Dutch Oven cooking easier, and "expert" Dutch Oven chefs all have their own personal favorites. Listed below is some of the fancy stuff you can buy, and some low-cost alternatives that you may already have around the house.
- Aluminum Foil - Heavy duty foil is best and has a multitude of uses. You can line the inside of the pot with foil to make cleanup easier, and use foil to keep items in the pot separate. Foil also makes a nice reflective base beneath the oven and protects the ground when cooking outside the fire pit.
- Chimneys - These help get the charcoal briquettes lit. You can buy a fancy briquette starter in most hardware stores, or make your own out of a coffee can with air holes punched in it.
- Folding Camp Shovel - A handy tool for moving briquettes (coals) around. Tongs work better, and leather gloves work fine for those times when you forget both tongs and shovel.
- Leather Gloves or Hot Mitts - For picking up briquettes and for removing hot lids to check on dinner. However, tongs and lid lifters are better for these tasks
- Lid Lifters - There are all sorts of fancy commercial lifters you can buy---some are spring loaded ($$$), others are made of wrought iron ($$). A claw hammer works great, and gloves or channel locks get the job done when you forget to bring the fancy stuff.
- Lid Supports - A place to put hot lids and keep them out of the dirt. You can buy a fancy one, or use a brick.
- Pie Plates - You can use these inside the oven to separate items, and outside the oven to keep food and utensils off the dirt. Aluminum foil works fine for most.
- Serving Utensils - This becomes a no brainer after you've forgotten them a couple of times.
- Tongs - A long pair is handy for moving briquettes or coals around. A shovel or gloves work also. All of these have definite advantages over using a pair of sticks to pick up hot coals.
- Whisk Broom - For cleaning ashes or dust off the tops of oven lids, or for sweeping out the inside of the pot itself.